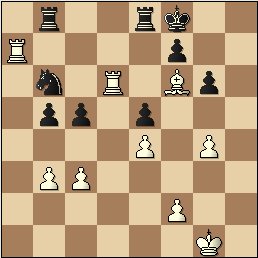
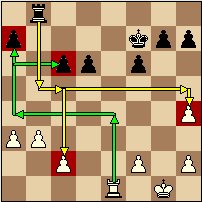
Diagram 1 White to Move
Taking the Elevator Down....
|
|
|
Diagram 1 White to Move |
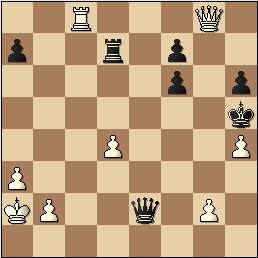
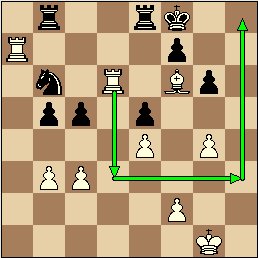
Diagram 2 White to Move |
Take a look at the above two positions. For each -
Evaluate the position. What are your moves candidates? What is your best move?
Spend 5-10 minutes considering your answers.
Please stop - some hints are below.
===================================================================
Controlling of the open file with the Rook is an extremely important strategic factor. It often allows various tactical opportunities. The common ones are as Back rank checkmate, double attack, penetration to the 7th rank to win material, etc…Almost like an elevator going to the top floor.
 |
<<=>> |  |
Some of the lesser known ideas - involve using the open file as trampoline for transferring the R to another file. This idea was mentioned by Aaron Nimtsovich in his masterpiece “My System.” Mark Dvoretsky contributed greatly to the development of this subject. I’d compare this to the elevator going to the middle floor and you have a skywalk (or something similar) to get to a different tower.
 |
<<=>> |  |
Please stop – SOLUTION is below.
====================================================================
In this article, I'd like to focus on slightly different examples of using the open file – this equivalent to taking the elevator down! Please check them and out and see what I mean.
| Diagram #1 above is from the game Gligoric
- Lombardy, (Germany 1958) – White has a serious advantage
here and has several decent moves candidates targeting Black’s Q-side.
For example, 1.Rc6 or 1.Ra6. But is this the most accurate
way? Well, actually, the best move is 1.Rd3!
White R takes the elevator down to the 3d rank and then transfers
to the h-file. Because of the mating threat, Black must play 1…Re6
2.Pg5 (or 2.Rh3) Kg8
3. Rh3 and Black must play 4....Rxf6.
After 5.Pxf6, White
gains material (wins exchange) and keeps his positional advantage.
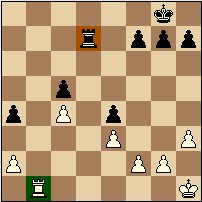
Diagram 1A shows the path of White R. |
 |
|
Diagram #2 above is from the recent game Golubev,M – Vajda,A Romania, 2005 – that I saw in the Chess
Today – my favorite daily e-mail newspaper. Playing White is
one of the CT editors and my friend and arch-rival from 25+ years ago. Black K is in trouble, but he has some coverage, thanks to the K-side pawns (both Black and White). Also, White’s pieces are decentralized and Black has a few attacking ideas of his own, including the perpetual. Take a look how Michael sends his R to take the elevator down. 1.Rc5+ Kxh4 (1...Pf5 doesn’t save Black. 2.Rxf5+ Kxh4 3.Rf4+ Kh5 4.Qg3 Qe6+ 5.Ka1) 2.Rc1 Qe6+ 3.Ka1 Black resigned. After 3… Qg4 4.Pg3+ he would lose the Q
|
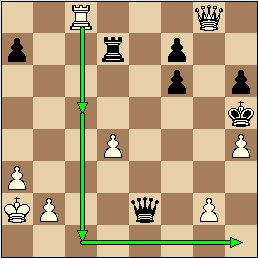
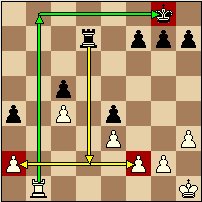
Diagram 2A shows the
path of White R. |
In Summary – while you should always be on the look out to grab the open file and try to penetrate opponent’s position, don’t disregard the possibilities to pull back your R in order to change the direction of your attack.
=====================================================================
How did you do? For comments send email or this
form
More on chess training (serious and enlightening)
| Chess Exam and Training Guide $24.95 + shipping | Chess Training Services |
Copyrighted @ 2006 Igor Khmelnitsky
For comments or permission to reprint please send inquires via email or this form