Improve your Chess via Active Learning
ACTIVE LEARNING is any strategy that involves students in doing things and thinking about the things they are doing (*)
You could study the following material either by skipping the test and going directly to the lecture. Or start by attempting to figure out on your own what is going on in each of the positions I will be talking about and then proceed to the lecture. If you chose the latter, spend time on each diagram and record your evaluation and move / plan for the side whose turn it is and sample variations. Then compare your ideas with mine. Let me know how you like the test and the lecture
Test yourself:
Level - beginner through advanced.
1. Check whose move it is / Read the question.
2. Evaluate position (i.e. White is Better, or Black is Winning, or Equal...)
3. Find the Best move and, if necessary, support it with variations. <<CALCULATE thoroughly!!>>
4. Answer the question (if there is a specific one)
|
|
|
|
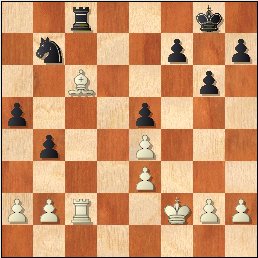
| #1. Black to Move. | #2. White to Move. | #3. White to Move. |
STOP - Lecture begins below.
Recognizing Defensive Threats
This article was originally published on the website http://www.chess.com/ in March 2009.
As you gain experience and rating, you realize the importance of paying attention to opponent's threats. Recognizing his plans, helps you avoid variety of unpleasant surprises. Often, it might enable you to setup a trap along the way, when you allow opponent to execute his 'threat' only to show that you have prepared something that benefits you not him. Not only you to be on the lookout for opponent threats against your pieces, but also his defensive ideas that threaten your attacking plans.
In this article, my focus is the latter - we will look how your opponent my be dealing with the pin and how you can prevent his defensive threats.
Diagram 0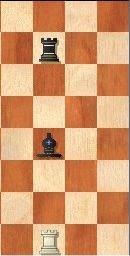
|
In the Diagram 0, you see a setup with the White R pinning the Black B. If the B moves, White wins the R. Eventually, to win the B, White would need to bring another attacker, ideally a P, but a piece would also be sufficient if Black can't mobilize enough defenders.
What are the Black's defensive threats here? Take a look at the Diagram 0A and you will see the most common ideas:
1. Moving the B with an attack strong enough to offset the possible loss of the R - checkmate, check, threat of checkmate, threat to capture Q or R. (1...Bd6+) 2. Move the R with an attack strong enough to offset the possible loss of the B - checkmate, check, threat of checkmate, threat to capture Q or R or B or N. (1...Rg7) 3. Defend the R, so the B can leave or Move the R where the B can retreat and defend it. (1...Rf6 or 1...Rf8, planning 2...Bh6) 4. Defend the B, so the R can leave (1...e5) |
Diagram 0A
 Black to Move |
Now, we are ready to tackle the three diagrams I offered you to solve.
|
Diagram #1
Black to move |
Li Shilong - Wang Yue, China 2007
The B is pinned, Black can bring another attacker, while White has no more defenders available. However, White has a defensive threat 1.Ba4, solving the problem at once. Therefore, Black played 1...b3!, giving up the P, but setting up a roadblock on the a4-d1 diagonal. after the forced 2.axb3 Nd8, Black won the B and soon the game.
Note, that if the Black Pf7 wasn't there (say it was on f6 instead), Black would have to deal with the threats 1.Bd5+ and 1.Ba4. Since, the former is much more serious, instead of 1...b3, Black would probably have to move his K to a dark square with only minimal advantage. |
|
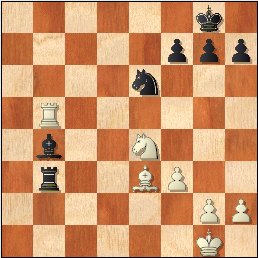
Diagram #2
White to move |
Capablanca,Jose Raul - Lasker,Emanuel, St. Petersburg (final) 1914
The Bb4 is pinned. Black has defensive threats 1...Rb1+ 2.Kf2 Be1+ 3.Ke2 Rxb4 and also 1...Rxe3.
The only way for White to address both threats is by playing 1.Bd2. Luckily for Black, he got a new defensive idea - 1...Bc5+!. After 2.Rxc5! Nxc5 3.Nxc5, White gained a small advantage. However, in the endgames, the R is often able to battle successfully against the 2 minor pieces. After tough defense (for some 70 moves!), Black succeeded in reaching a Draw.
Unnecessary check - 1.Rb8+ would cost White any winning chances. After 1...Nf8, White no longer has 2.Bd2 due to 2...Bc5+. |
|
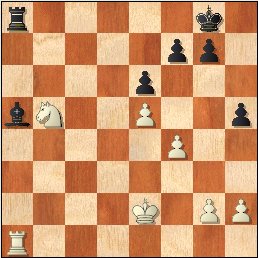
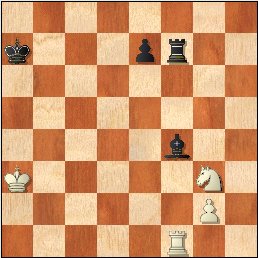
Diagram #3
White to move |
Bluvshtein,Mark - Paschall,William M, Budapest 2007
The B is pinned once again, but now Black doesn't have any defensive threats (I'll ignore for now a plan of getting K from g8 to b8). The question is - how White can get more pressure on the B? The K can't come closer due Rd8+. This leaves White with planning to get the N to either b3, c4, c6 or b7. It only takes two moves for the N in order to get there, however the path must be chosen very carefully.
All moves but 1.Nd6, would enable the R to leave the B and attack the N - i.e. 1.Nc7 Rc8 or 1.Nc3 Rc8 or 1.Nd4 Rd8. In the case of the latter, White can continue 2.Nc6 and get into a messy fight after 2...Rd2+. Ultimately, White wins the B, but Black picks up a couple of pawns with some drawing chances - (3.Ke3 Bc3! 4.Rc1 Rxg2 5.Rxc3 Bxh2+/-). Also, after 1.Nd4, note that Black's other defensive resource - 1...Bb6 (offering exchange to save the B) fails due to 2.Rxa8+ with check.
Once you recognize all Black's defensive ideas, the solution is not hard to find. Actually there are two. [A] To take away Black's ability to play Rd8-Rd2+ by playing 1.Ra2 then 2.Nd4 and 3.Nc6 (or 3.Nb3). Black can try 1...Kh7, planning to meet 2.Nd4 with 2...Bb6, limiting damage to only loss of exchange. Still, White should be winning. [B] To take away Black's plan of Ra7-Bb6 by planting the White R on a4. After 1.Ra4!! Black resigned at once. No matter what he plays, White has 2.Nd6 and 3.Nc4. For example, 1...g6 2.Nd6 Ra7 3.Nc4 Bb6 4.Nxb6! - the R on a4 is defended by the N.
|
Summary:
Focus on opponent's ideas both offensive and defensive. Before executing a threat, consider what would you have done if you were in your opponent's shoes. As you improve you ability to recognize opponent's defensive plans, your threats will become much more dangerous!
==============================================================================================
What do you think about this article? How did you do? For comments,
corrections send email or use
this
form
More on chess training (serious and enlightening) in my books:
|
|
Chess Exam and Training Guide (2004) $24.95 + shipping Chess Exam and Training Guide: Tactics (2007) $19.95 + shipping CE + CE Tactics (Holiday Special! Free chess cartoon calendar $8, while supplies last) - $39.95 - insured shipping in US is included |
Copyrighted @ 2009 Igor Khmelnitsky
For comments or permission to reprint please send inquires via email or this form
(*Bonwell, C., & Eison, J. (1991). Active learning: Creating excitement in the classroom (ASHE-ERIC Higher Education Report No. 1). Washington, DC: George Washington University, p. 2)
