
Test yourself:
All Positions - spend no more than 15 minutes on each.
1. Check whose move it is.
2. Evaluate position (i.e. White is Better, or Black is Winning, or Equal...)
3. Find the Best move and, if necessary, support it with variations
|
|
|
| 1. White to Move | 2. White to Move | 3. Black to Move |
|
|
|
| 4. Black to Move | 5. Black to Move | 6. White to Move |
Bishop Off-side
The subject of today’s mini-test is a misplaced Bishop. The first two positions should be extremely easy for all, except for true novices.
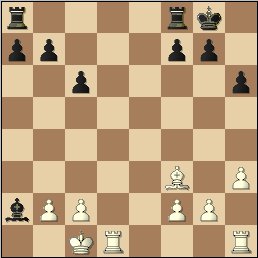
#1. Training position (Khmelnitsky). White is winning the Bishop for the Pawn after 1.Pf4-f5. The Bishop is trapped and attacked by a less valuable piece.
Similar situations often occur in games of novices when the B pins the N (for example Bc8-g4 pinning Nf3) and then is attacked consequently by pawns h and g (or a and b).
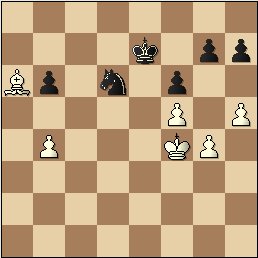
#2. Training position (Khmelnitsky). White is winning the Bishop once again. This time he plays 1.Pb2-b3 cutting the escape route and preparing 2.Kc1-b2. Unlike in the example #1, here Black has a move before his Bishop will be attacked. Yet, there is no move that could help.
Similar situations often occur in games of novices when B grabs the Pawn on the R file (a or h). Note, that if the black Pawn a7 was on a5, Black could play 1...Pa5-a4 2.Kc1-b2 Pa4xb3 3.Pc2xb3. Now the B is protected by the Ra8. Black would have to move the Ra8 to a5, a6 or a7 to free the square for the other Rook in anticipation of 4.Rd1-a1.
2.Kf4-e3 Ke7-d7 3.Ke3-d3 Kd7-c7 4.Kd3-d4 Kc7-c6, or 2.Pg4-g5 Ph8-h6 freezing the K-side, or 2.Ph5-h6 Pg7xh6 3.Kf4-g3 (3.Kf4-f3 Ke7-d7 4.Kf3-g2 Kd7-c6 5.Kg2-h3 Kc6-b6) 3...Ph6-h5! If interested, please practice with a friend or computer.
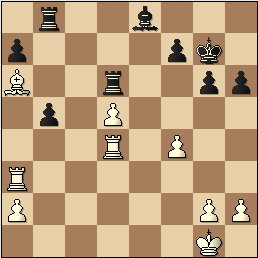
#4. This example is from the game Lautier,J - Bauer,C, Championnat de France, 2006. The B on a6 is trapped and is about to be lost. Black is winning. However, you get no points for hasty 1...Rbb6? as after 2.Ba6-c8, the B escapes. Instead, Black played 1....Be8-d7 gaining control over c8. White is losing the Bishop for a Pawn. For example, 2.Kg1-f2 Rb8-b6 3.Ba6xb5 Rb6xb5 4.Ra3xa7 Rb5xd5.
#5. This training position (Khmelnitsky), is truly amazing in its unexpected simplicity. Looks like White is the one who has the initiative and probably small advantage. However, after 1...Re8-b8, it is Black who has winning position. The Ba6 is once again under arrest. White has no good counterplay against Black's plan of sending the King to b6 and then bringing another attacker - the Rook on a8, to win the trapped Bishop.
Examples 3-5 show you that squares a6, a3, h3, h6 are often not safe for the Bishop, when the escape route is (or can be) cut out. The Pawn b5 was such a barrier in these examples.
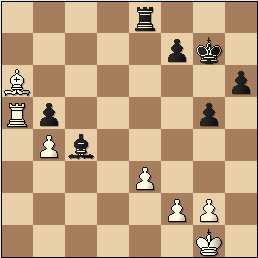
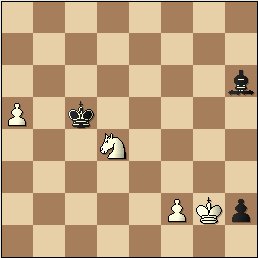
#6. Finally, the last position is there to remind you that even on the open board, the Bishop may have problems finding a safe spot. In this study by Reti (1922), White is winning. He has many moves and your head may start spinning when you try to calculate all possible variations. My suggestions would be - when you don't see a knock out punch, stop for a moment and ask yourself this questions - what would he do if I did nothing? In this particular position - Black has no useful move. All Bishop's moves allow fork with the Knight (ex. 1...Bh6-g7 2.Nd4-e6+). Another fork is available after 1...Kc5-d6 - 2.Kd4-f5+. And the remaining King's moves allow the Pawn a to get through. Hence comes the quite 1.Kg2-h1 putting Black in zugzwang and winning.
When you don't see a knock out punch, stop for a moment and ask yourself this questions - "what would he do if I did nothing?"
Summary: a Bishop is a long ranged piece and needs open space to show its strength in attack. On defense, a Bishop is often a solid force as well. Depending on its placement, a Bishop's range is anywhere from 7 (ex. from a1, a7) to 13 (ex. from d4 or e5) available squares. When some of these squares become unavailable, the Bishop can get into trouble as in the examples shown above. Memorize these typical ideas. Also, remember, that merely trapping the Bishop may not be enough to succeed. Two common options - find a way to attack and win the trapped Bishop giving you material advantage (examples 1-5) or start actions away from the Bishop so it can't participate giving a virtual material advantage (see example in this article).
==============================================================================================
What do you think about this article? For comments send email or this
form
More on chess training (serious and enlightening)
|
|
Chess Exam and Training Guide (2004) $24.95 + shipping Chess Exam and Training Guide: Tactics (2007) $19.95 + shipping CE + CE Tactics (Special) - $39.95 - insured shipping in US is included |
Copyrighted @ 2007 Igor Khmelnitsky
For comments or permission to reprint please send inquires via email or this form
